Add Sitruna to your Amazon account
November 8, 2025
Share to
1. Generate a URL
- Go to the Global User permission page (UK / EU here) (USA here)
- (if the above links do not work then please go to Settings > User Permissions, and find the "Manage Global Permissions" link. Ensure you have selected "Authorised Partners" and not "users" on this page
- Providing Sitruna with access to your Amazon Seller Central account is a quick two part process. As a member of Amazon's Authorised Service Network, we gain access as an Amazon's Authorised Partner, rather than via the normal secondary user permissions. The steps are:
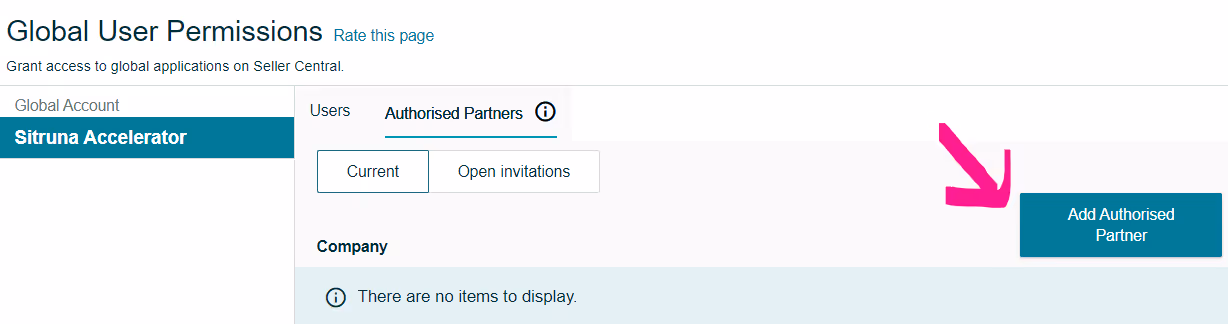
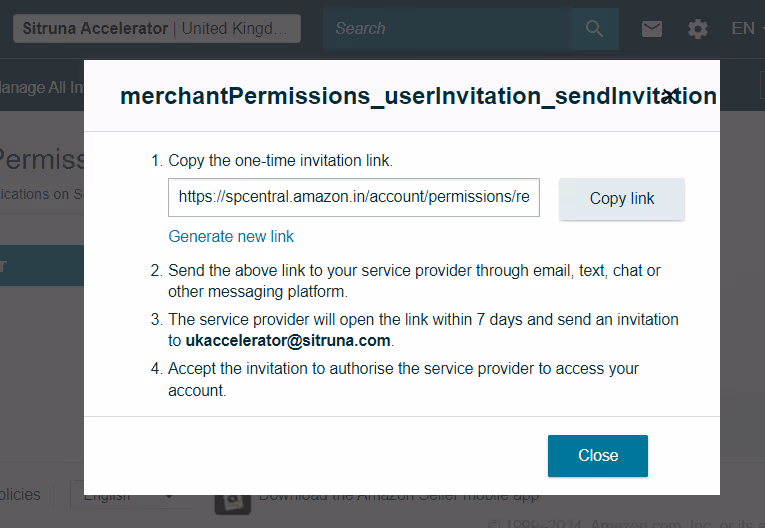
- Click the blue "Add Authorised Partner" button
- Copy the link in the pop-up and send the url link in a reply to this email
TIP: If you don't have access to the "User Permissions" page, you may still be on the Individual subscription plan which doesn't allow secondary users.
Alternatively, you may not have the required permissions to add users from your own login - make sure you are using the "primary user" email (the one you used to register your Amazon account).
2. Accept invite & add user permissions
- Once you have shared your URL, you will receive an email to approve Sitruna as an authorised user.
- Please accept this invite.
- Generate a personalised invite URL
- Amazon should automatically redirect you to the Manage Global Permissions page; if not please go to the Global User permission page (UK / EU here) (USA here)
- (if the above links do not work then please go to Settings > User Permissions, and find the "Manage Global Permissions" link. Ensure you have selected "Authorised Partners" and not "users" on this page.)
- Accept an invite and assign required permissions
- If you don't receive an email, instead please go to the above page and click the "Open Invitations" tab - you should be able to accept our invitation from there. Look for "Sitruna SPN".
- Click the checkbox under "Admin" or “View and Edit” to assign permissions. See below for the permissions that we require.

Permissions to add:
Please add "View & Edit" permissions to everything in the following sections:
- Advertising
- Brand Benefits
- Growth
- Inventory
- Media Upload
- Performance
- Reports
- Store Design
Under Orders, we will need:
- Manage Orders
- Transactions
Under settings, we will need:
- Fulfilment By Amazon
- Global Messaging Dashboard
- Manage Your Cases
- Merchant Token
To grant Sitruna direct access to manage permissions and add any permissions we may require in future, under Settings, please add
- Manage Authorized Partners
You can assign admin permissions for the whole section in bulk by clicking "Admin" at the top of the section rather than the individual checkboxes.
If an error appears, you may need to select half the sections; save; then select the second half as there is a limit of 100 permissions at a time.
.avif)


